
Your Custom Text Here

Cirque Du Vulgar
By Em
I have had the privilege of working with Cirque du Vulgar alongside Len Copland on a number of occasions and I jumped at the chance when Len got in contact with me last week and said he had another session booked.
Len shoots for the press, but on this occasion I was shooting for the joy of it, the characters in the troupe are just amazing and so much fun to work with. I hope this comes across in the images I’ve included here.
If you’d like a peek at Len’s work, head over to his site here:
https://lencoplandphotography.blogspot.com


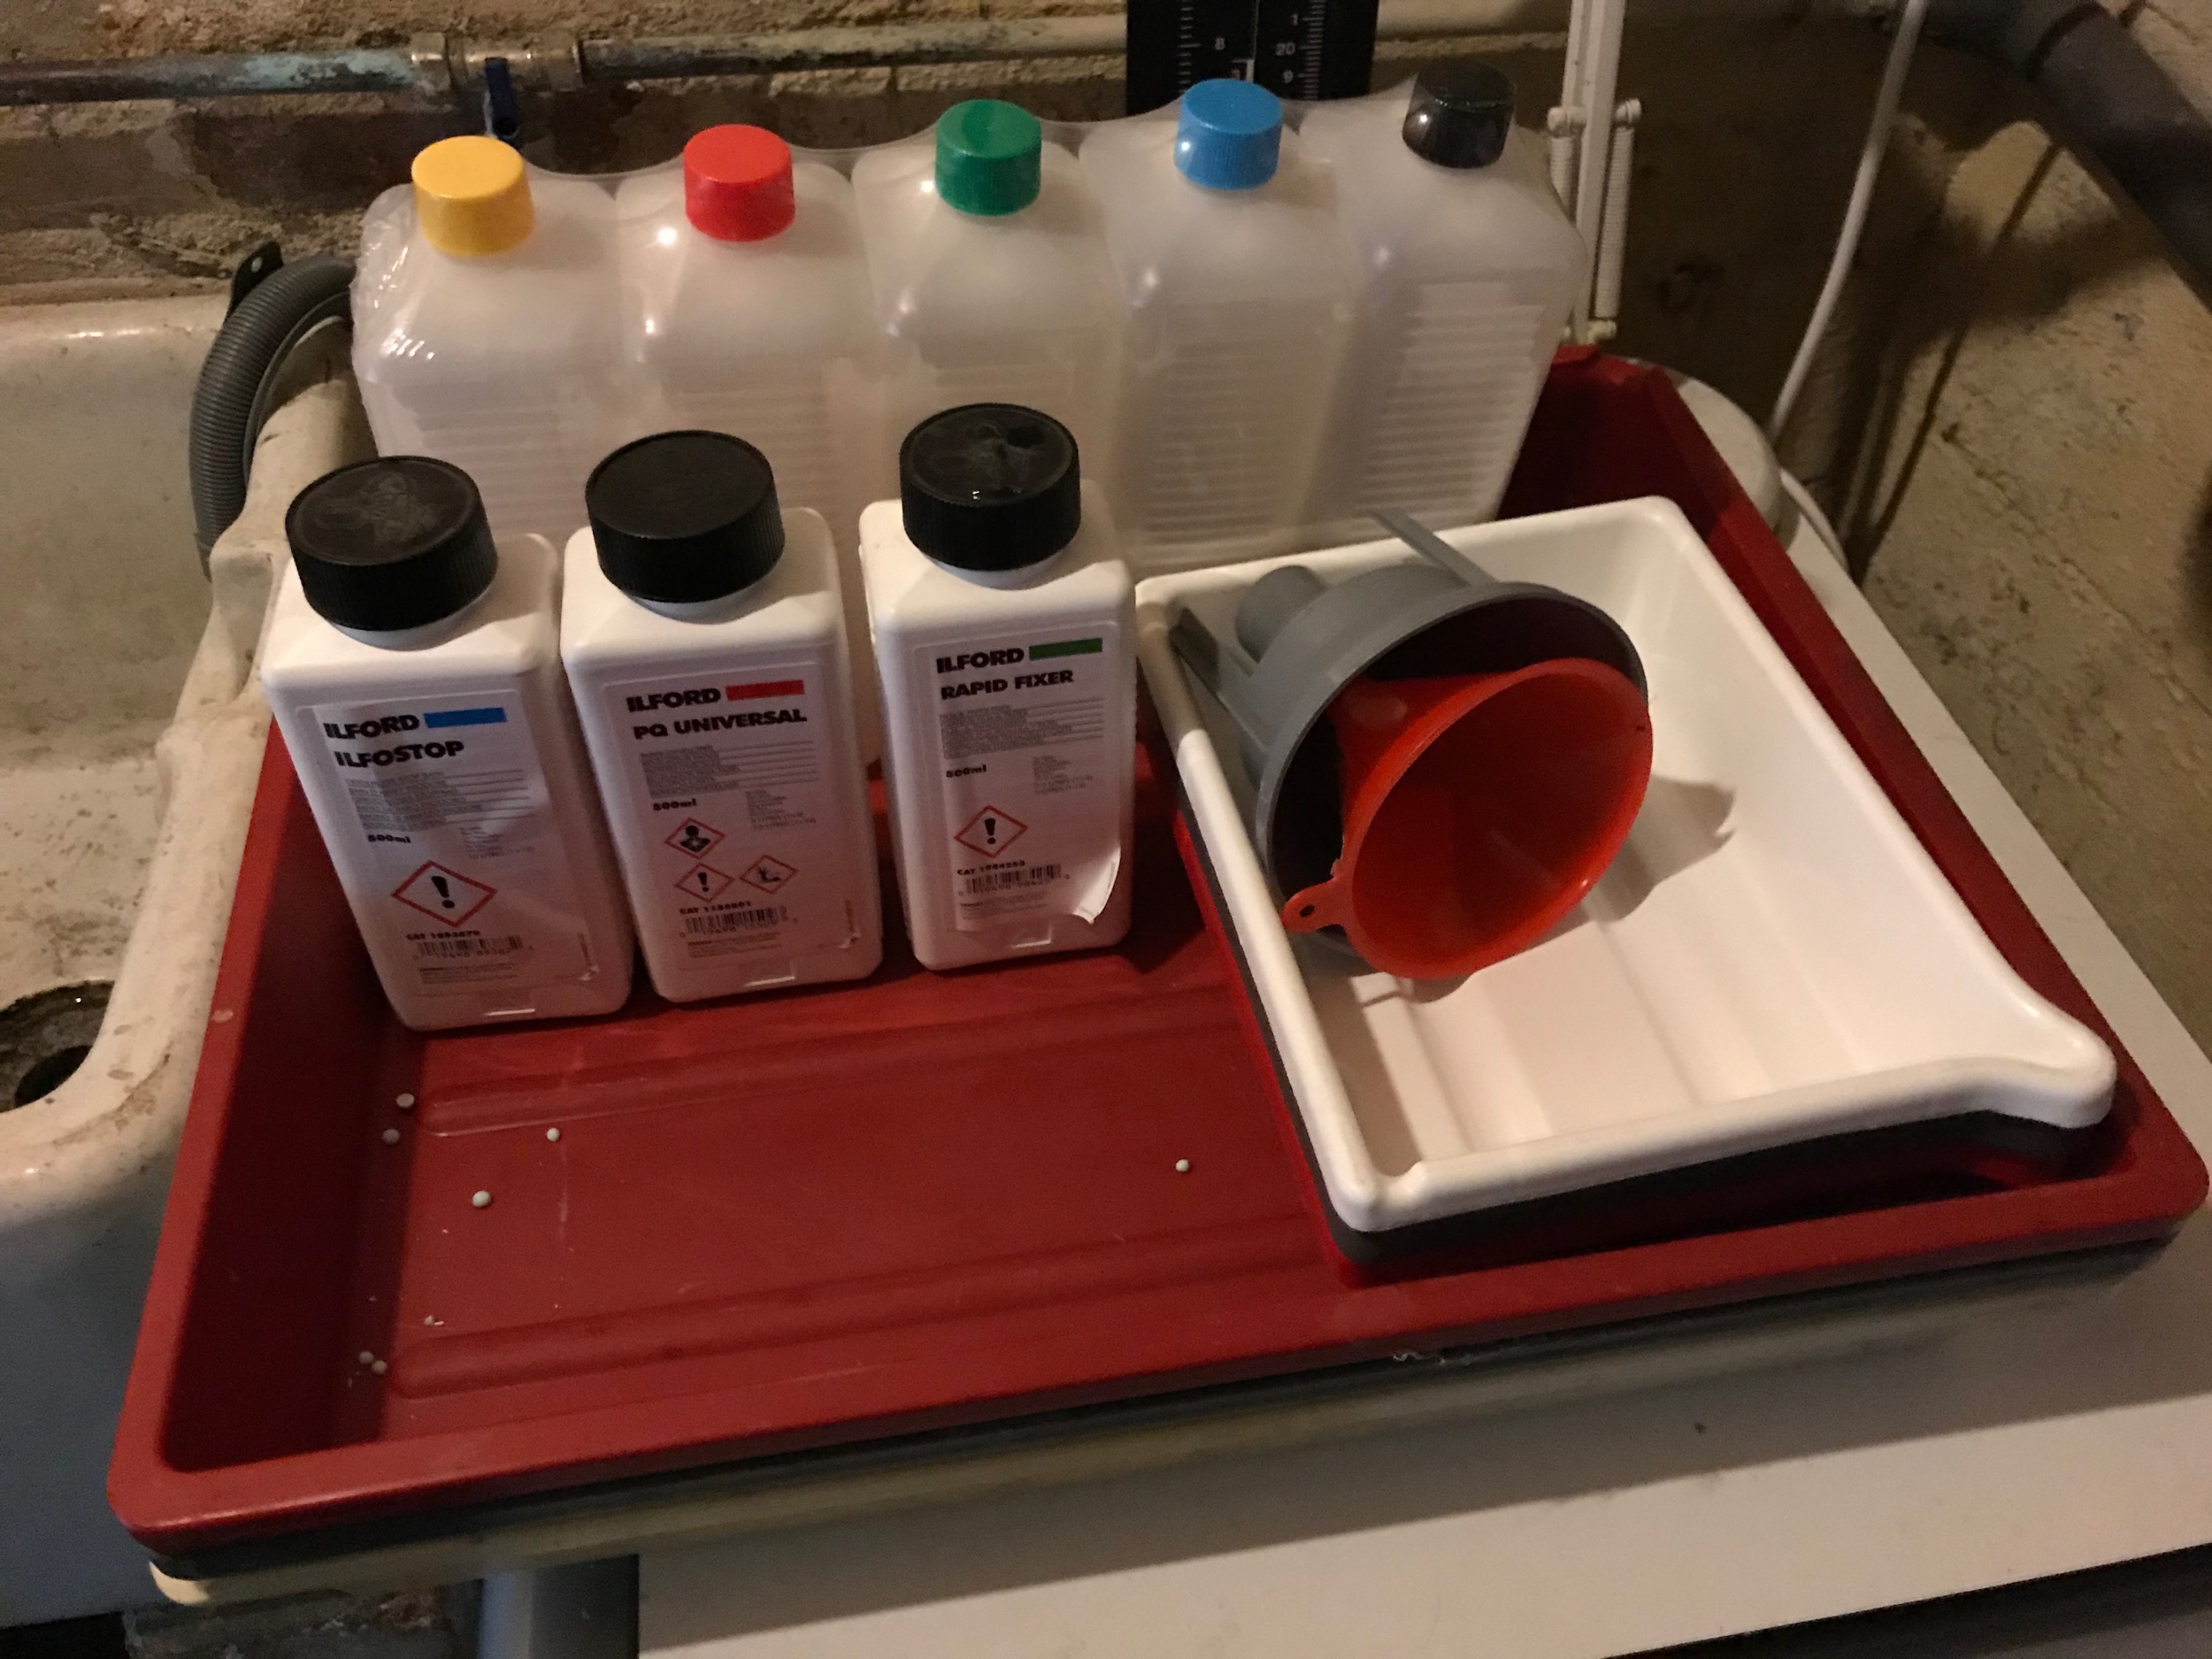
Darkroom kit and chemicals
you can’t process anything without the correct chemicals and in this post we will let you know the basic kit you need to get you started.
the first thing you need is somewhere dark to load the film! when we first started we didn’t have anywhere set up so we used a changing bag that we bought from amazon.
using a changing bag is a bit tricky but you soon learn to put everything in the bag before you start! the first time you forget something and you can see it sitting on the side while your arms are stuck in the bag, you soon make sure you don’t repeat that mistake.
you can see in the first image that we have three different chemicals. i’m sure we will go into more details in another post, but essentially you start with the developer, then place the film into a stop bath to prevent further development, followed by the fixer to ‘fix’ the permanent image.
we’re currently using ilford direct positive paper, which is extremely slow and requires a long exposure time, but it produces an image straight away, similar to a wet plate process.
all of the above were purchased from amazon, including the dinky trays, which we bought to save on chemicals as we’re only processing 4x5 inch images.

medium format photography
by em
The following is an extract from one of my photography projects. The theme was titled ‘Obsession’ and for this I chose to focus on the use of mobile phones.
During my course I have been lucky enough to borrow the college’s Yashica Mat 24 Medium format twin lens reflex camera. I have wanted to experiment with medium format since starting this course and this particular project presented the perfect opportunity.
I have carried it with me to a number of locations on my travels, which is no small feat as it’s quite heavy! I suspect that medium format might be my ideal format – I love processing film and the slowed down process of analogue photography, and medium format gives me the huge high quality SQUARE negative. There’s everything to like about it. And 120 roll film only has 12 square shots to a roll, so I don’t spend ages trying to fill a roll for development.
This first picture is from a trip to Bristol. The other great thing about a TLR is that you don’t look at your subject directly, but stare down in the direction of your feet, which makes you much less intimidating. Even if people do notice you, they are fascinated rather than threatened. This has let me be a little more direct with photos, as this picture shows:
Bristol Pret. F/3.5 60ms
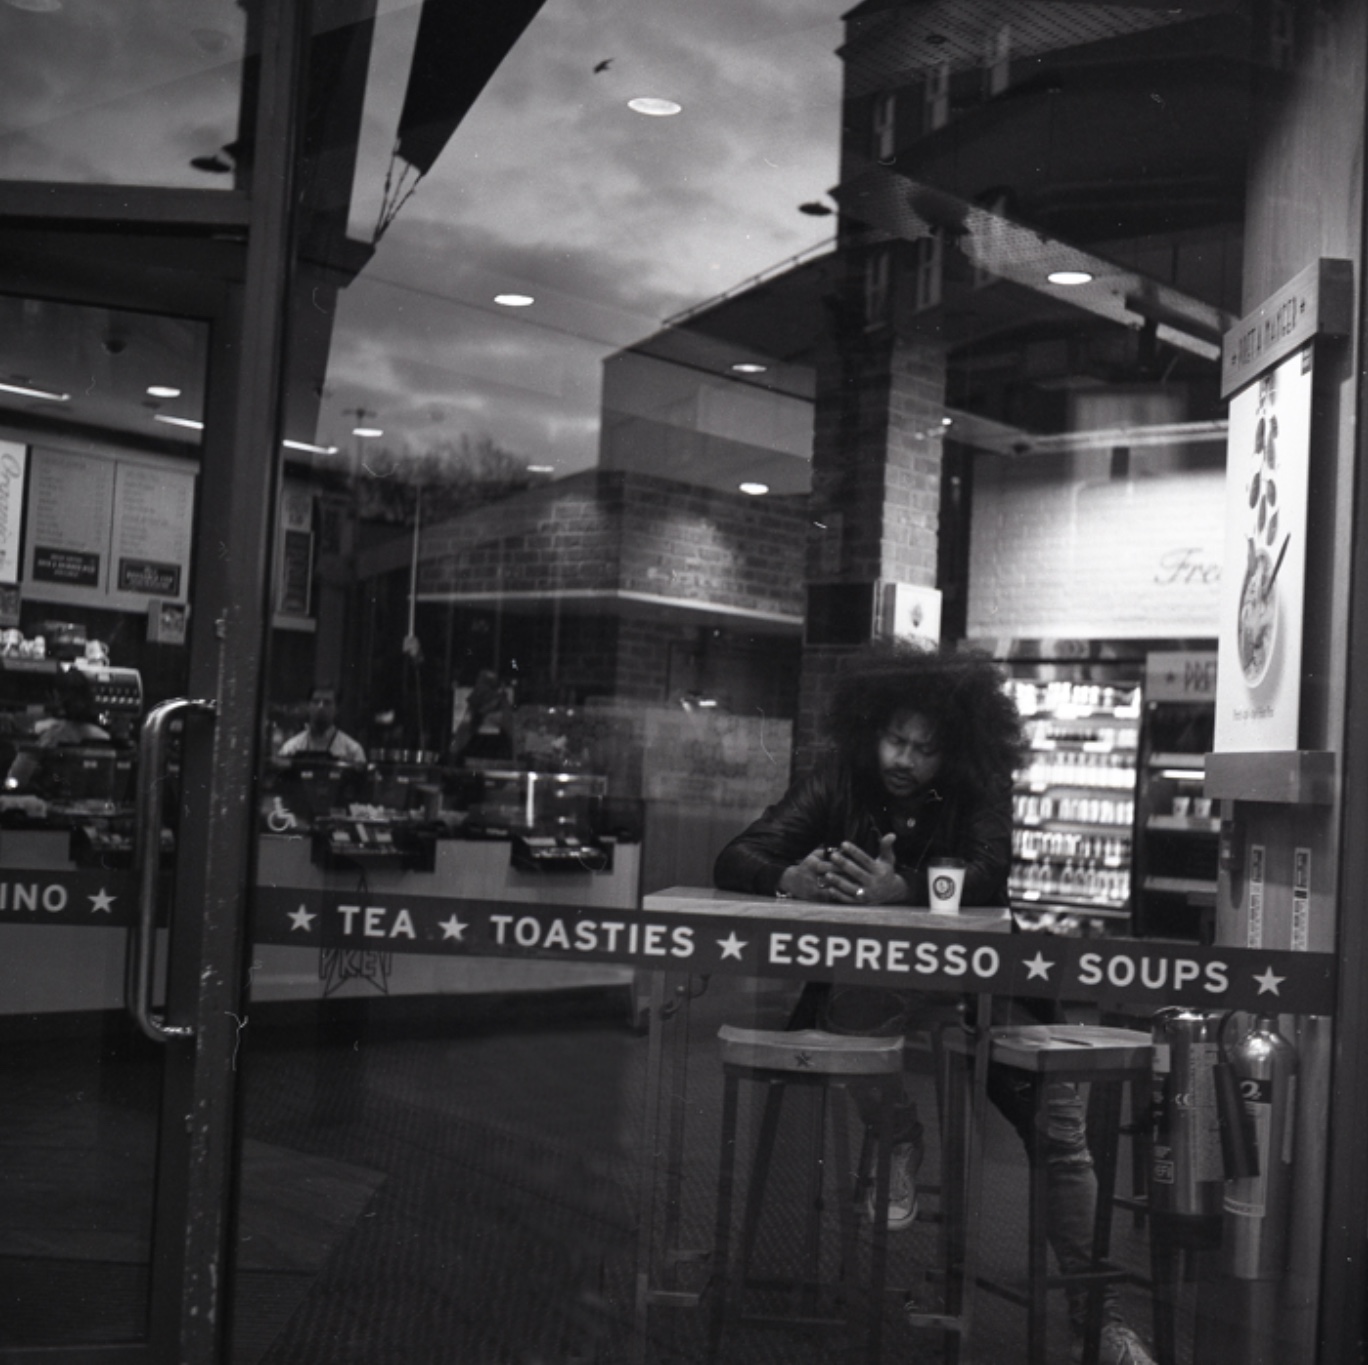
This picture has had some post processing as there was an unsightly bollard in the foreground. I know this goes against the grain for true street photography, but this is my blog and I want to make it pretty!
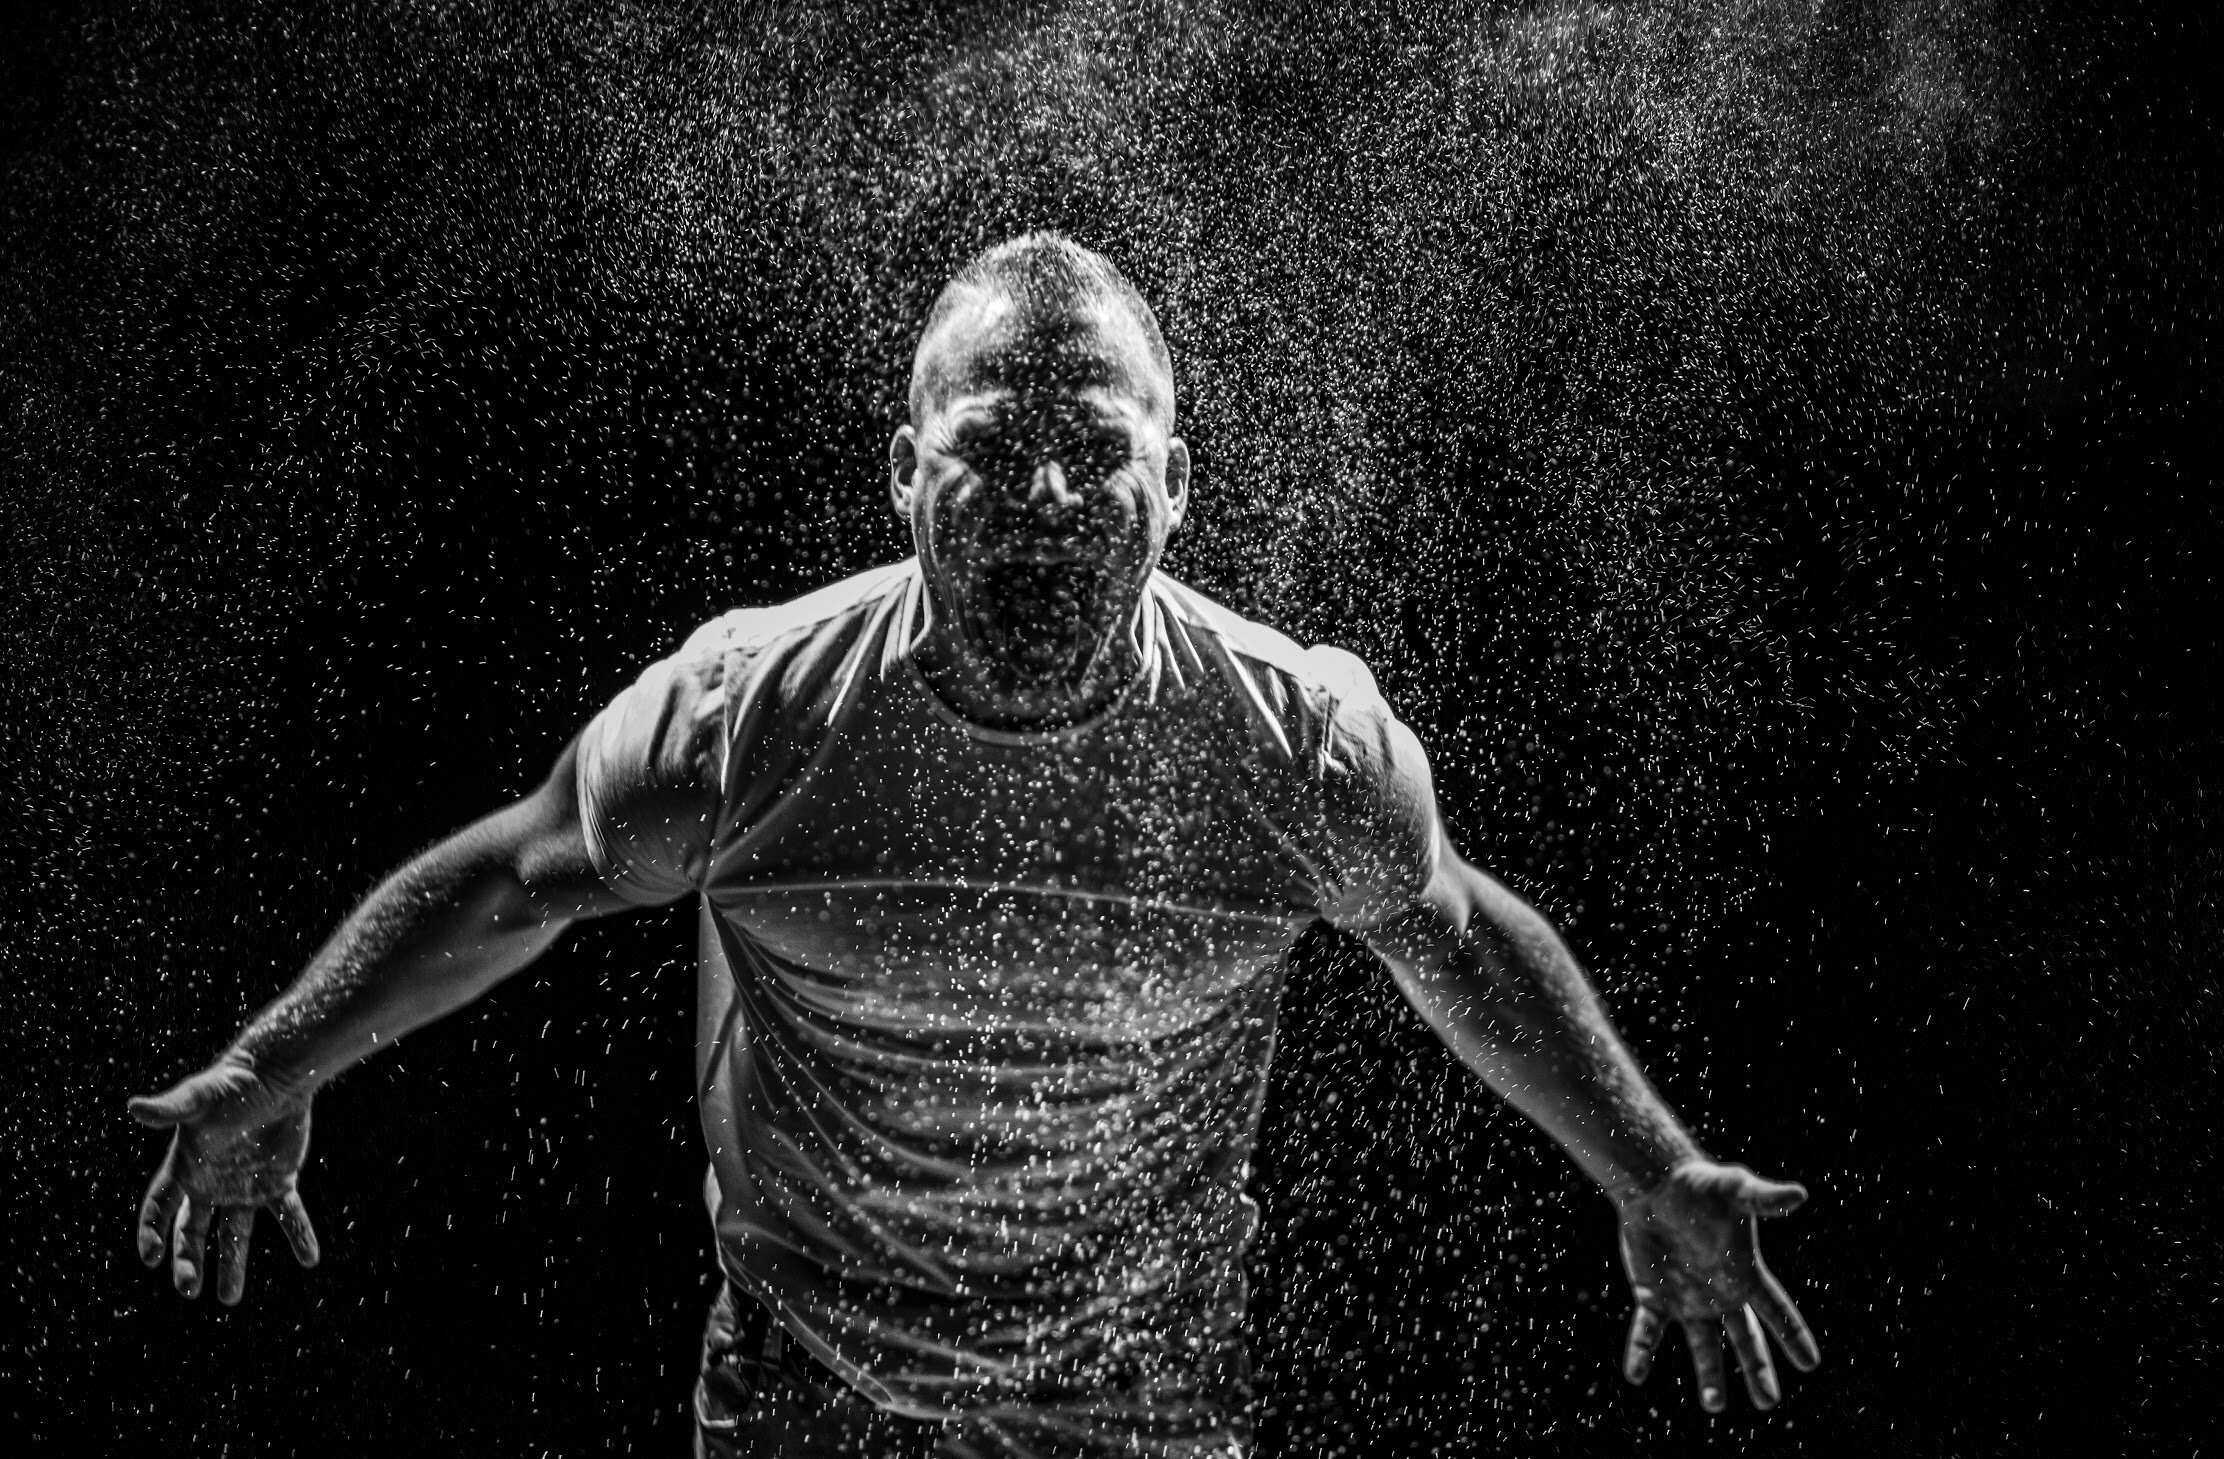
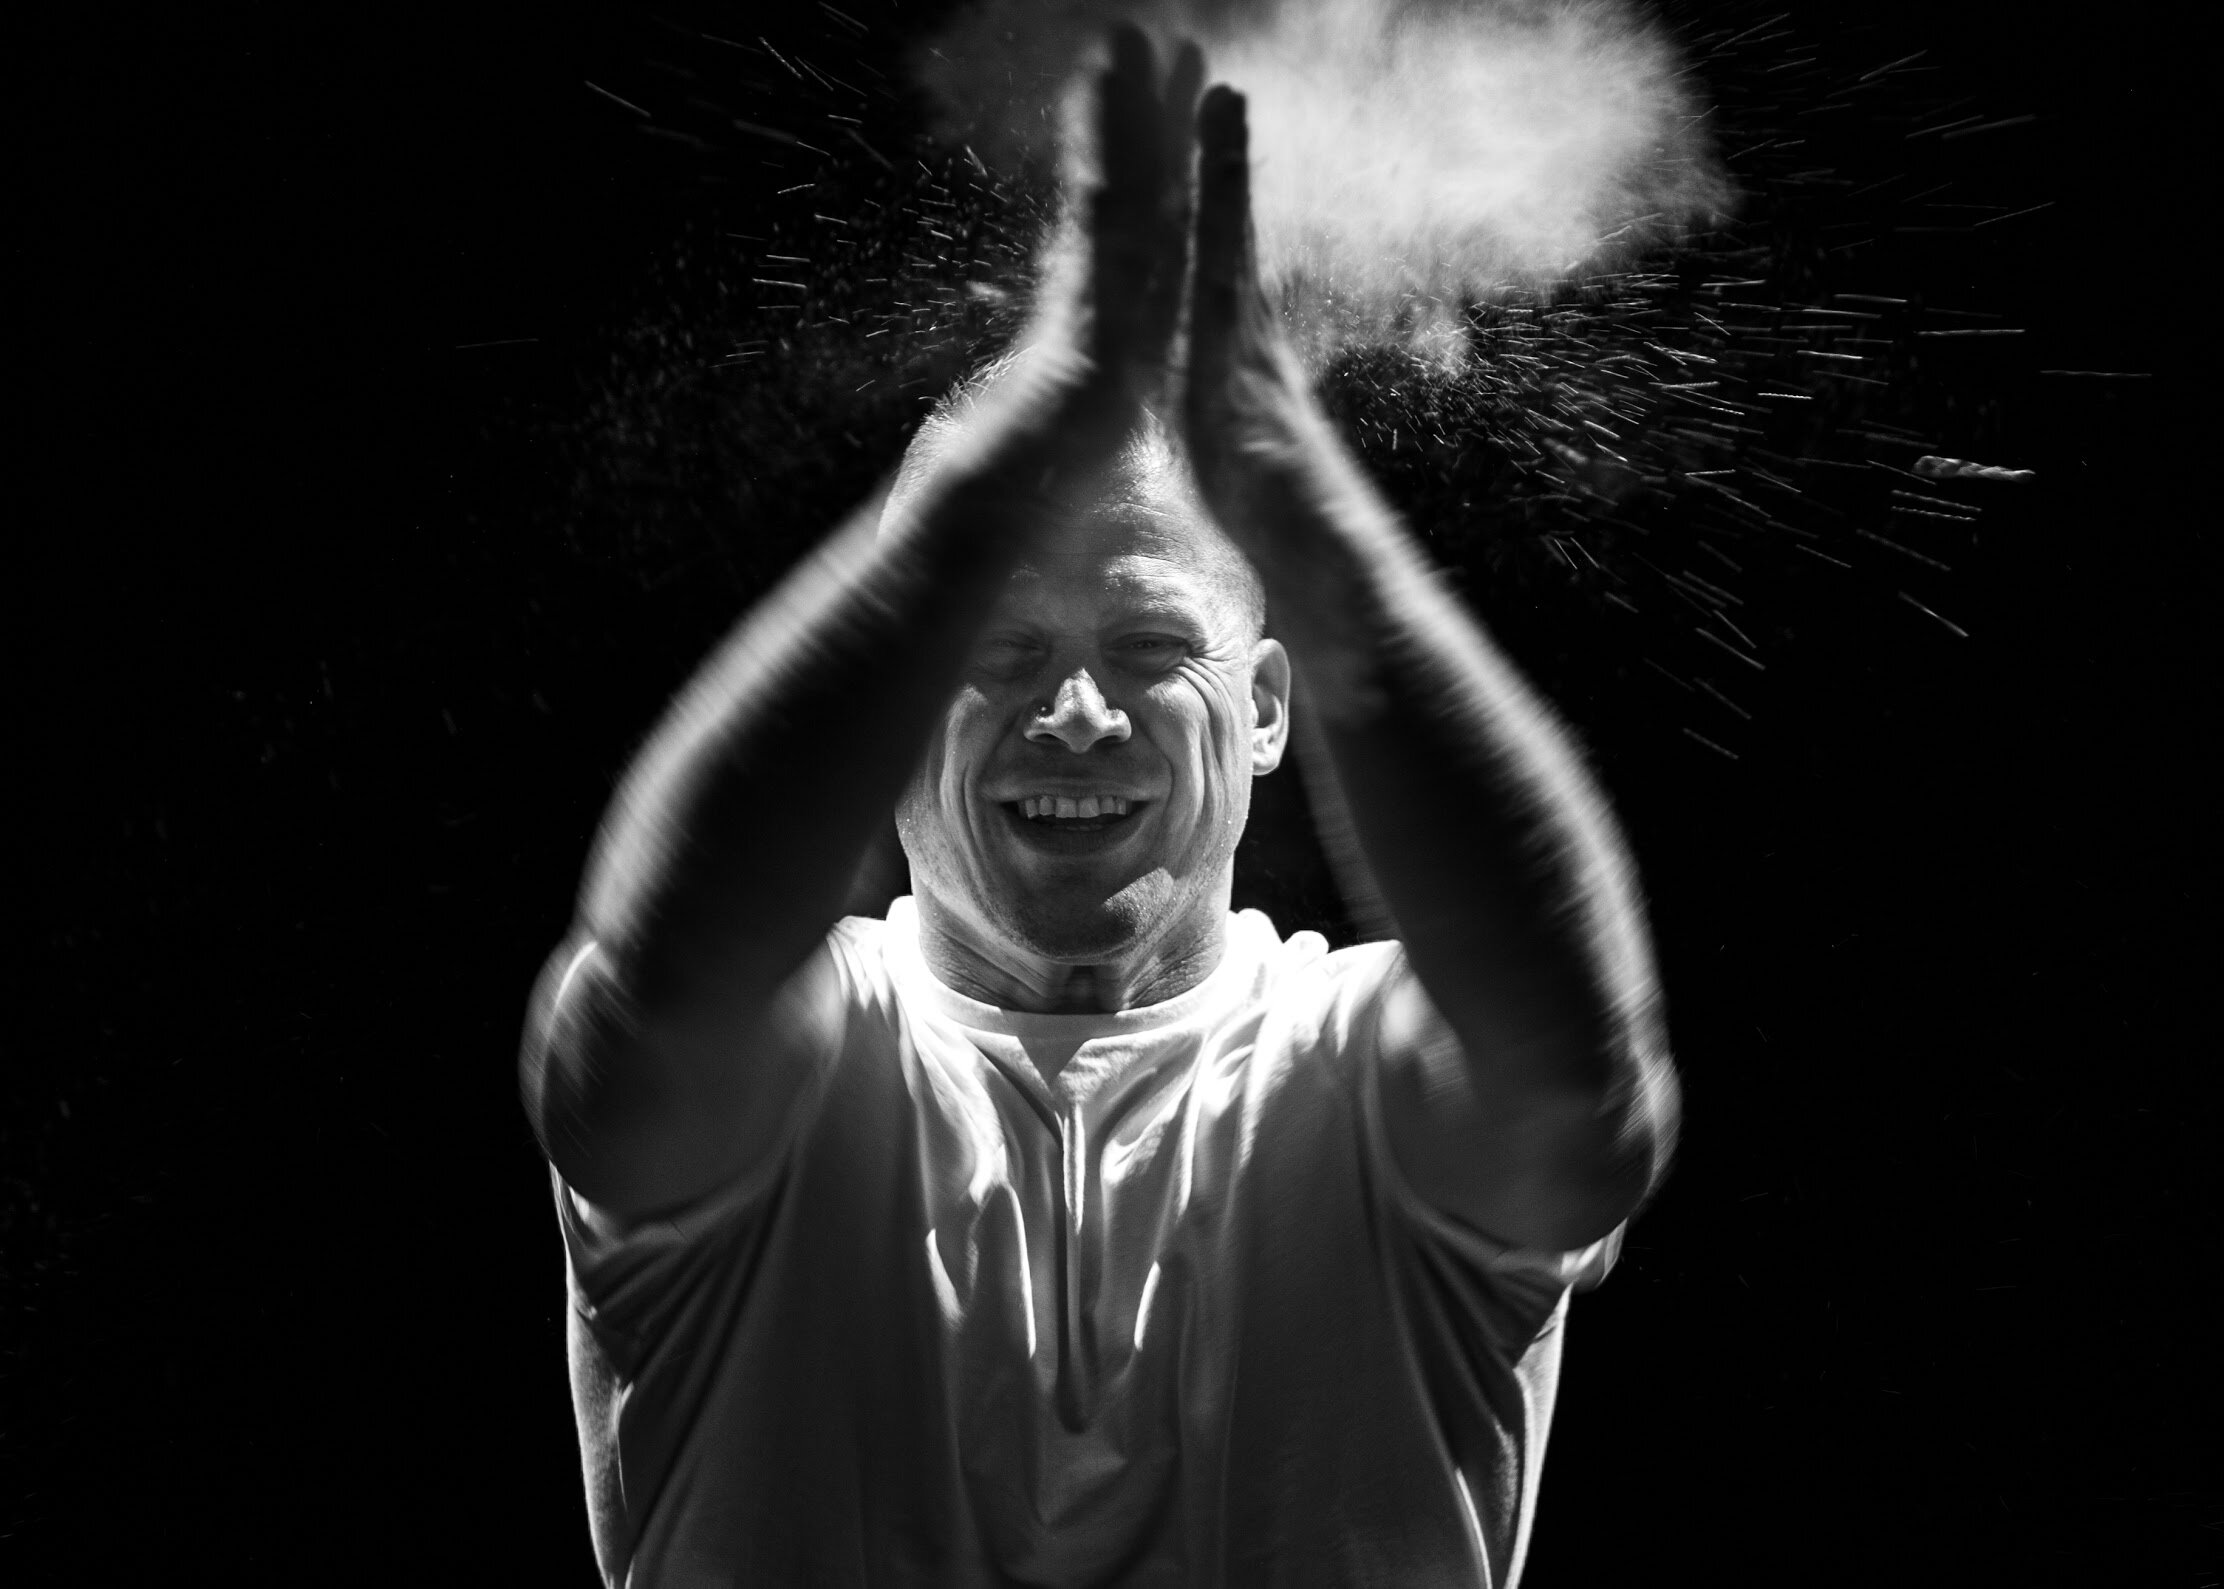
I was fortunate enough to have the opportunity to use the TLR in a studio situation. The college has an excellent studio and Adam was kind enough to lend me one of the college’s Speedlites and help me to set it up.
I am extremely excited to present these images of Len, who was kind enough to pose for me. These are the first medium format studio portraits I have ever taken and from a roll of 12 pictures I have managed to get 4 good quality street photos and 4 studio portraits. I love this camera!
Len. F/4 125ms

This is one of 4 shots I took of Len. I used a light meter on Len’s cheek to measure the ambient light for both of the included studio shots. The flash unfortunately failed to fire on two, and I only have the light from the screen of his phone, so they are unusable, but it’s all a learning process.
I love the eye contact in this picture. On one of the failed images I had removed his lanyard, which made the image slightly more timeless, but given the context and the mobile phone, I don’t think this is too much of a problem. I have cleaned up some dust from the image in Lightroom. I need to remember that this size of negative appears to be very good at collection detritus from the darkroom!
Len’s Phone. F/5.6 125ms
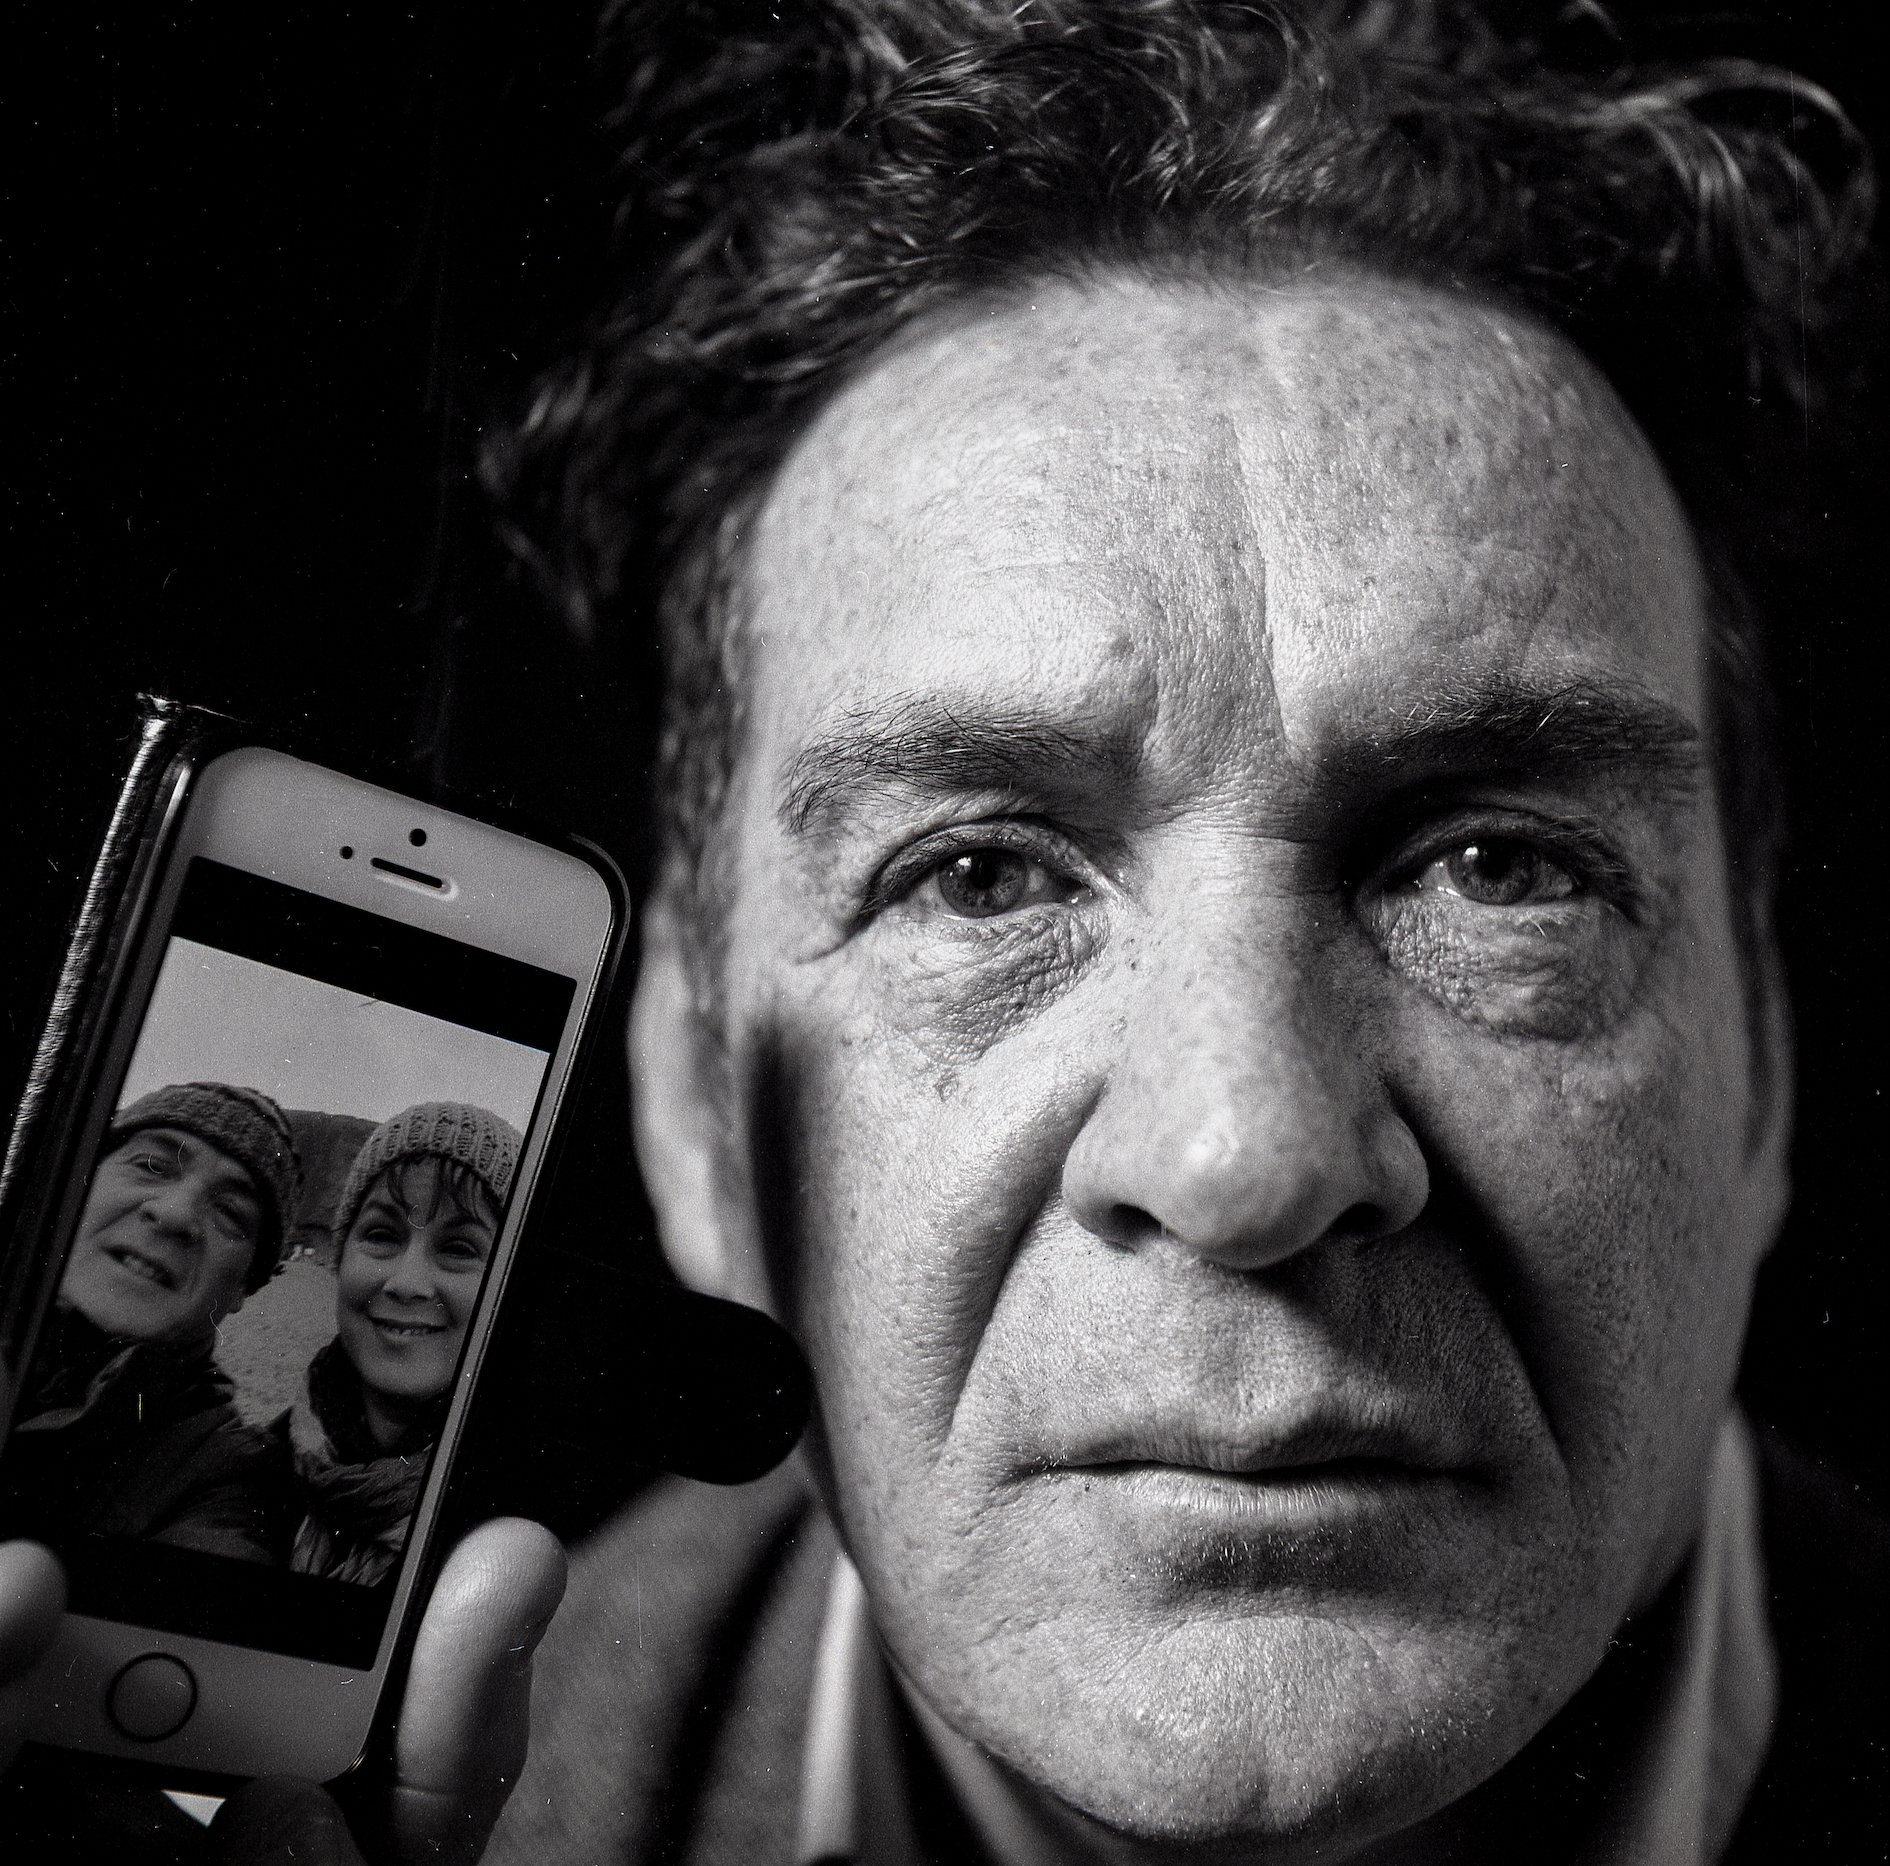
For this image, we attached a good quality close up lens to the camera and I got in real close. I find this image really engaging and love the tones on his face. I am pleased with the detail that the camera can achieve, even with a close up attachment on the front.
Since completing the project I now have a Bronica medium format slr camera, with a couple of lenses which I use to shoot personal work.

film holders
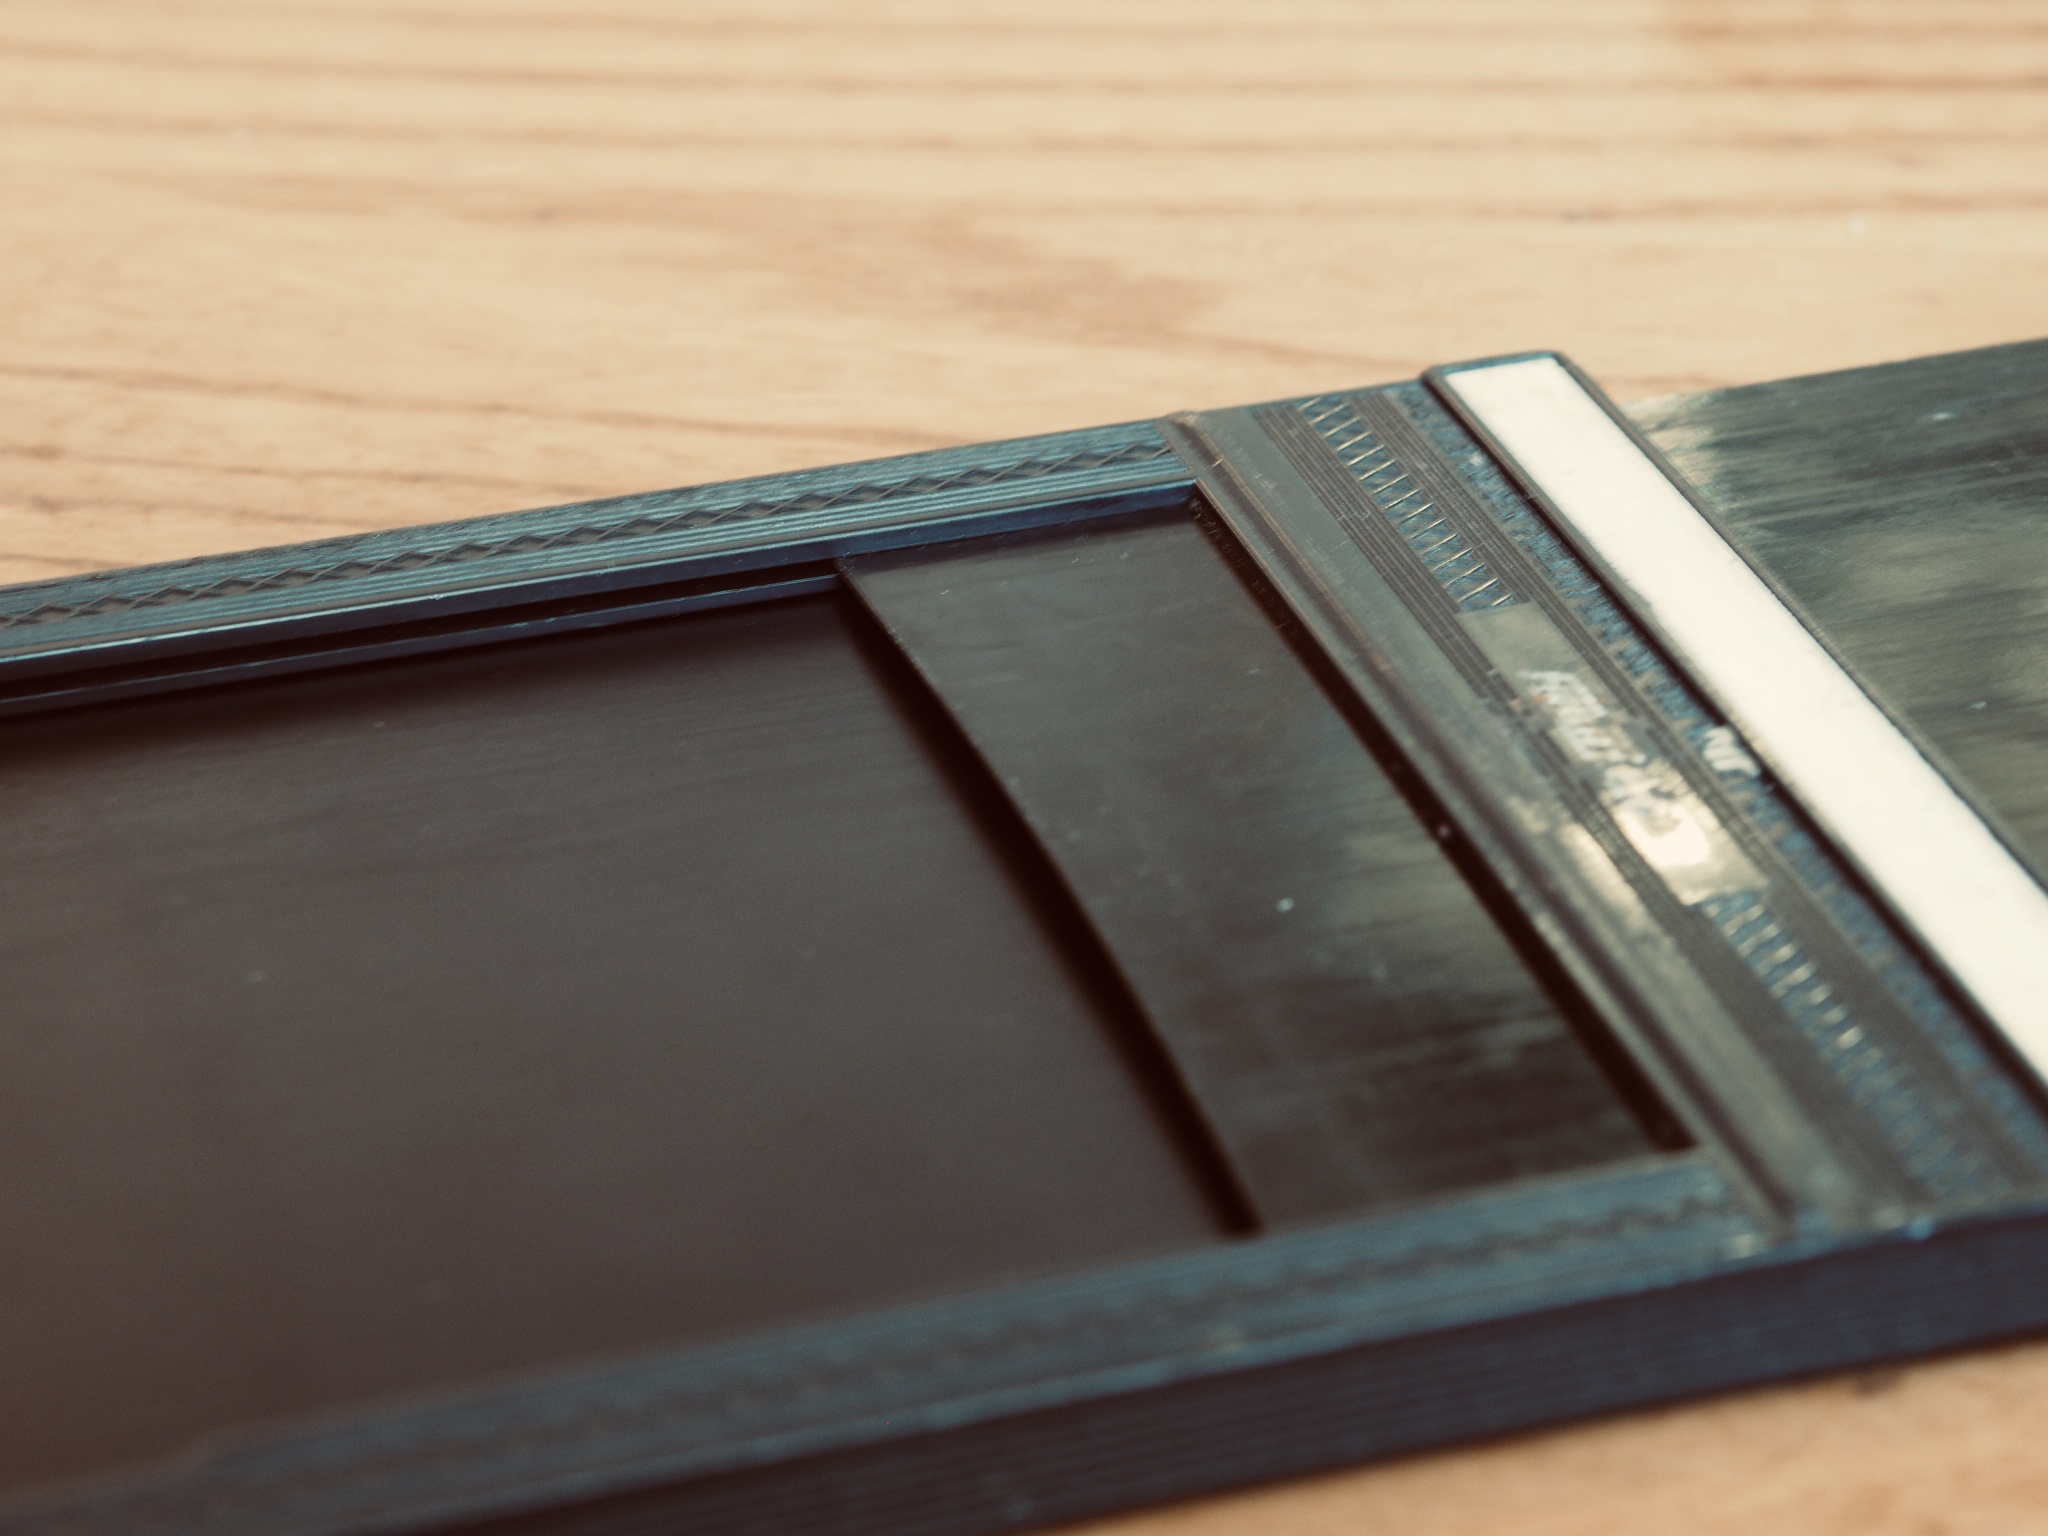
film holders attach to the back of the camera body and hold the sheets of film. their purpose is to stop light getting to the film until you’re ready, to keep it perfectly flat, and to let you take more than one picture at a sitting. to help with this last point, each of the film holders we show here can take a sheet of film to a side.
you have far less flexibility with wet plate photography as each plate is simply a treated piece of metal (or glass) which has to be shot and processed within a matter of minutes…but we’re not there yet!
the film holders pictured are relatively cheap and from ebay - they’re well used but work perfectly fine. in the second image you can see the dark slide pulled back to show the slot where the film is held. the dark slide prevents any light from hitting the film until it is removed.
more about the Intrepid camera
film cameras are essentially a light-proof box with a lens on one end and film at the other. the distance between the two is what causes the image projected by the lens to be in focus on the film.
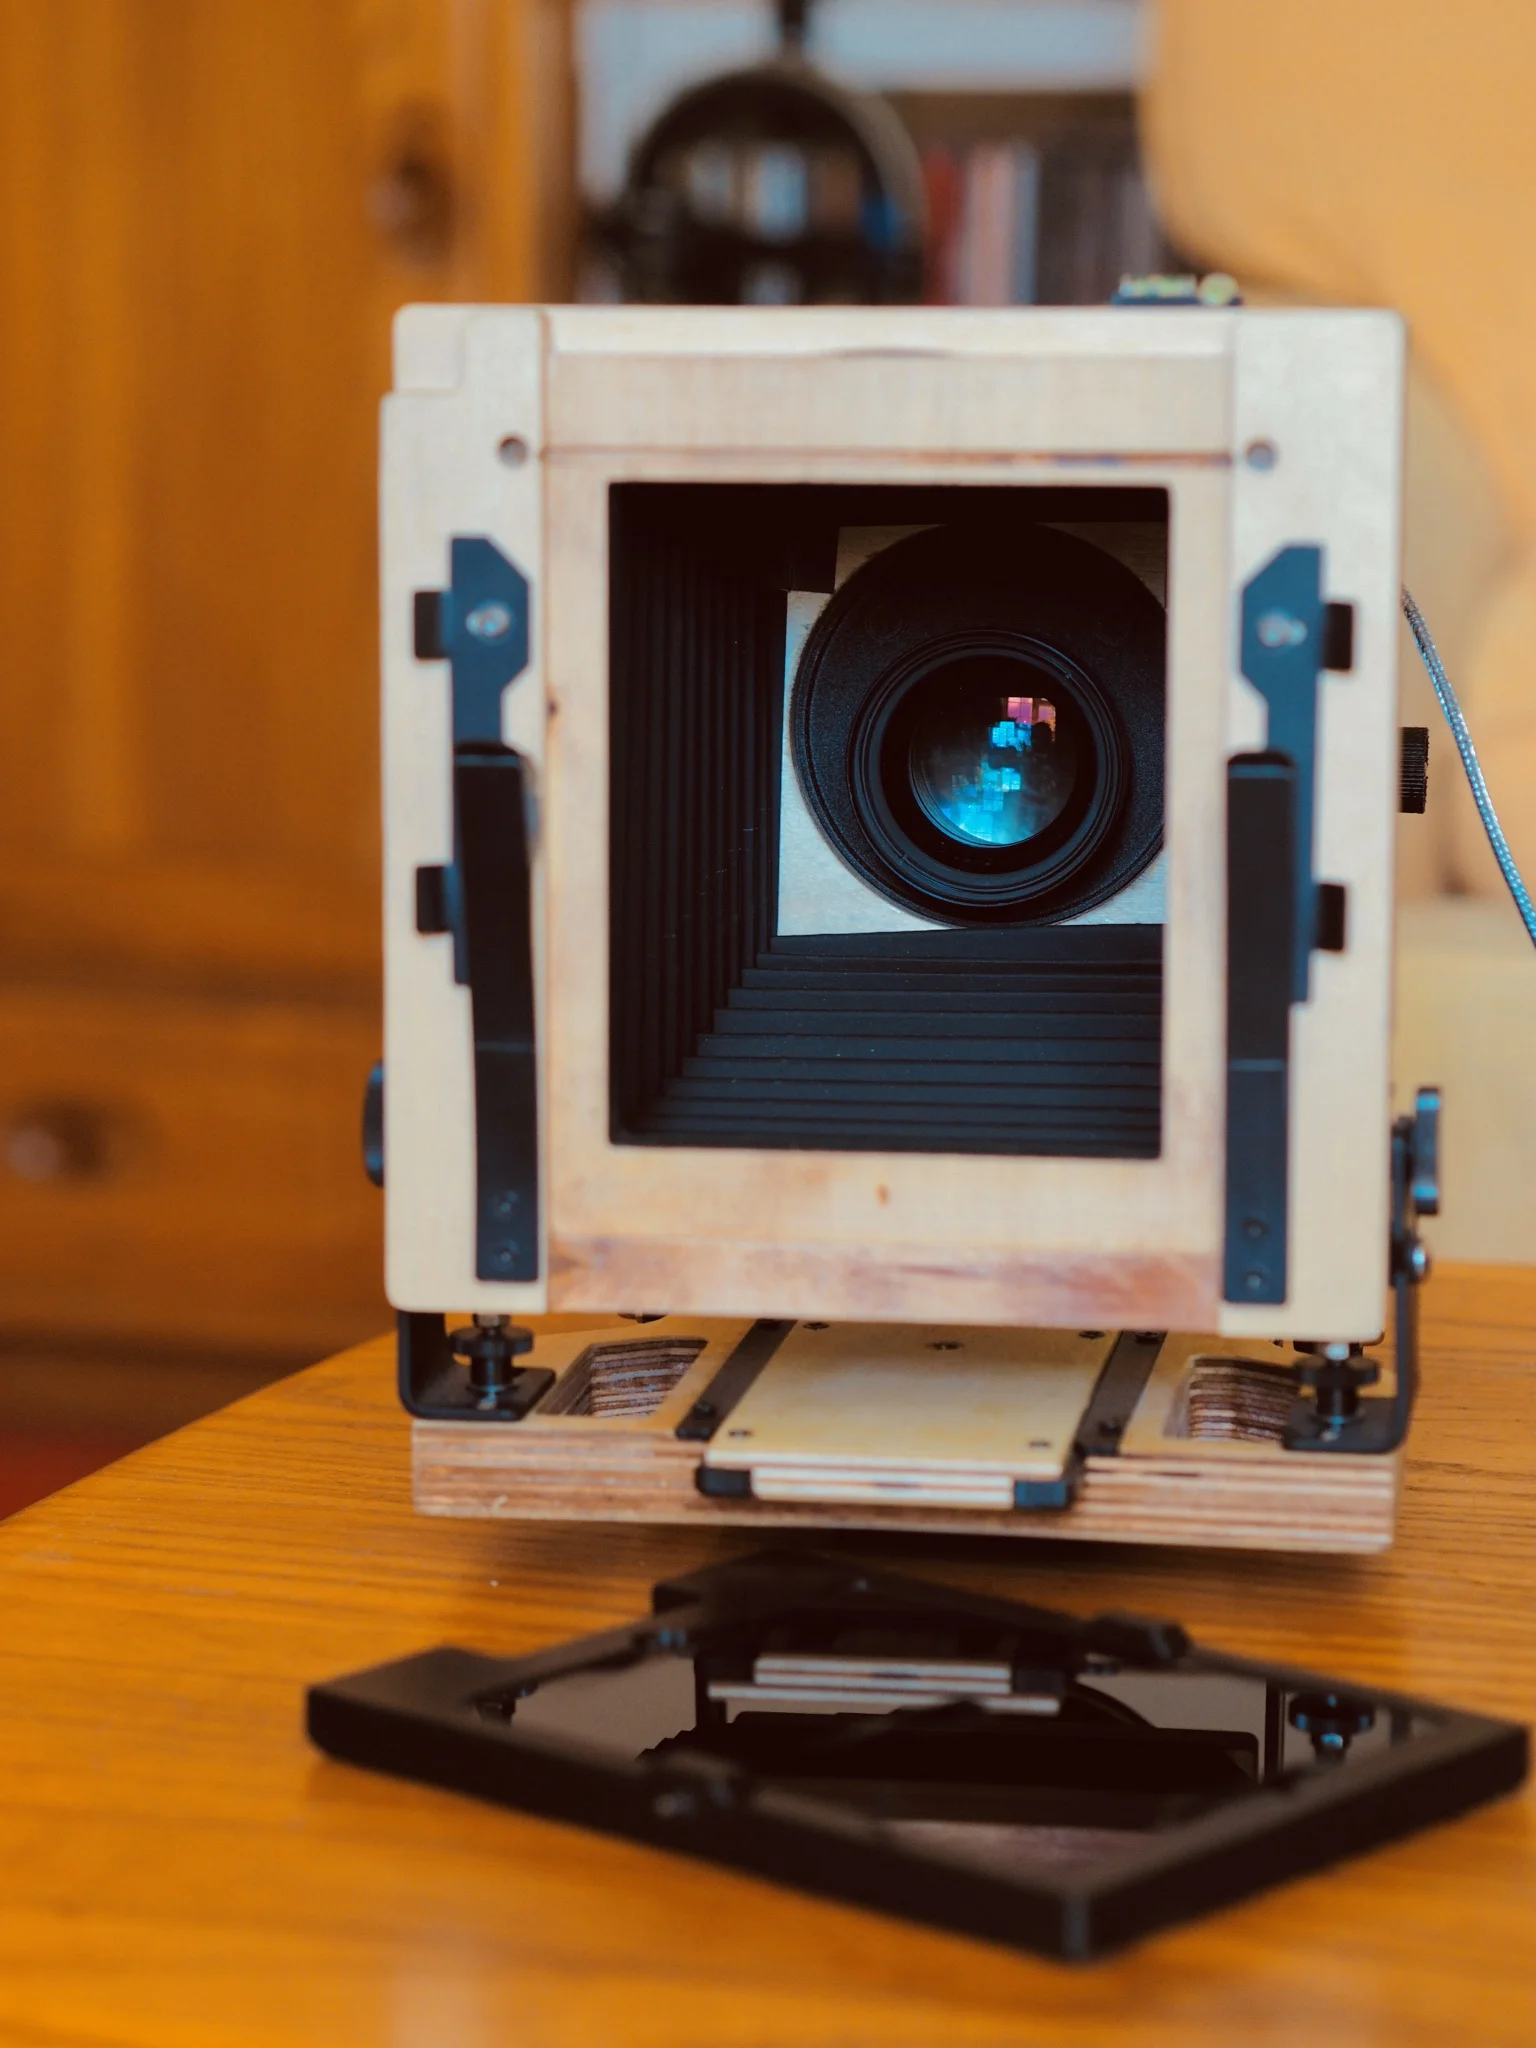
nowhere is this more obvious than with large format photography. in the case of the Intrepid camera, the distance between the film and the lens is controlled by bellows and a simple rail system. the main camera body is laminated wood and there’s little else to it.
here are a couple of images of our camera, with the film holder and ground glass removed from the back so that you can see right through to the lens.


the next thing that a camera needs to do is control the amount of light that hits the film. this is controlled by the lens and shutter, and we’ll talk a bit about that later.

wet plate
the idea to embark on this insane experiment in artisanal photography came from when i was working on a module for my degree and the wonderful Adam Clark at Yeovil College decided to show us the new camera he had just purchased. it was actually the same model that we are now working with at something borrowed, from Intrepid Cameras. there’s a portrait I took of Adam in the set below.
at the moment we are working with more traditional film chemicals that you could have bought in boots the chemist a decade ago, but wet plate is an entirely different animal and we will be posting mode details and history of that process in the future.
in the meantime, here are some of the plates that we produced in our first faltering steps towards the previous millennium.


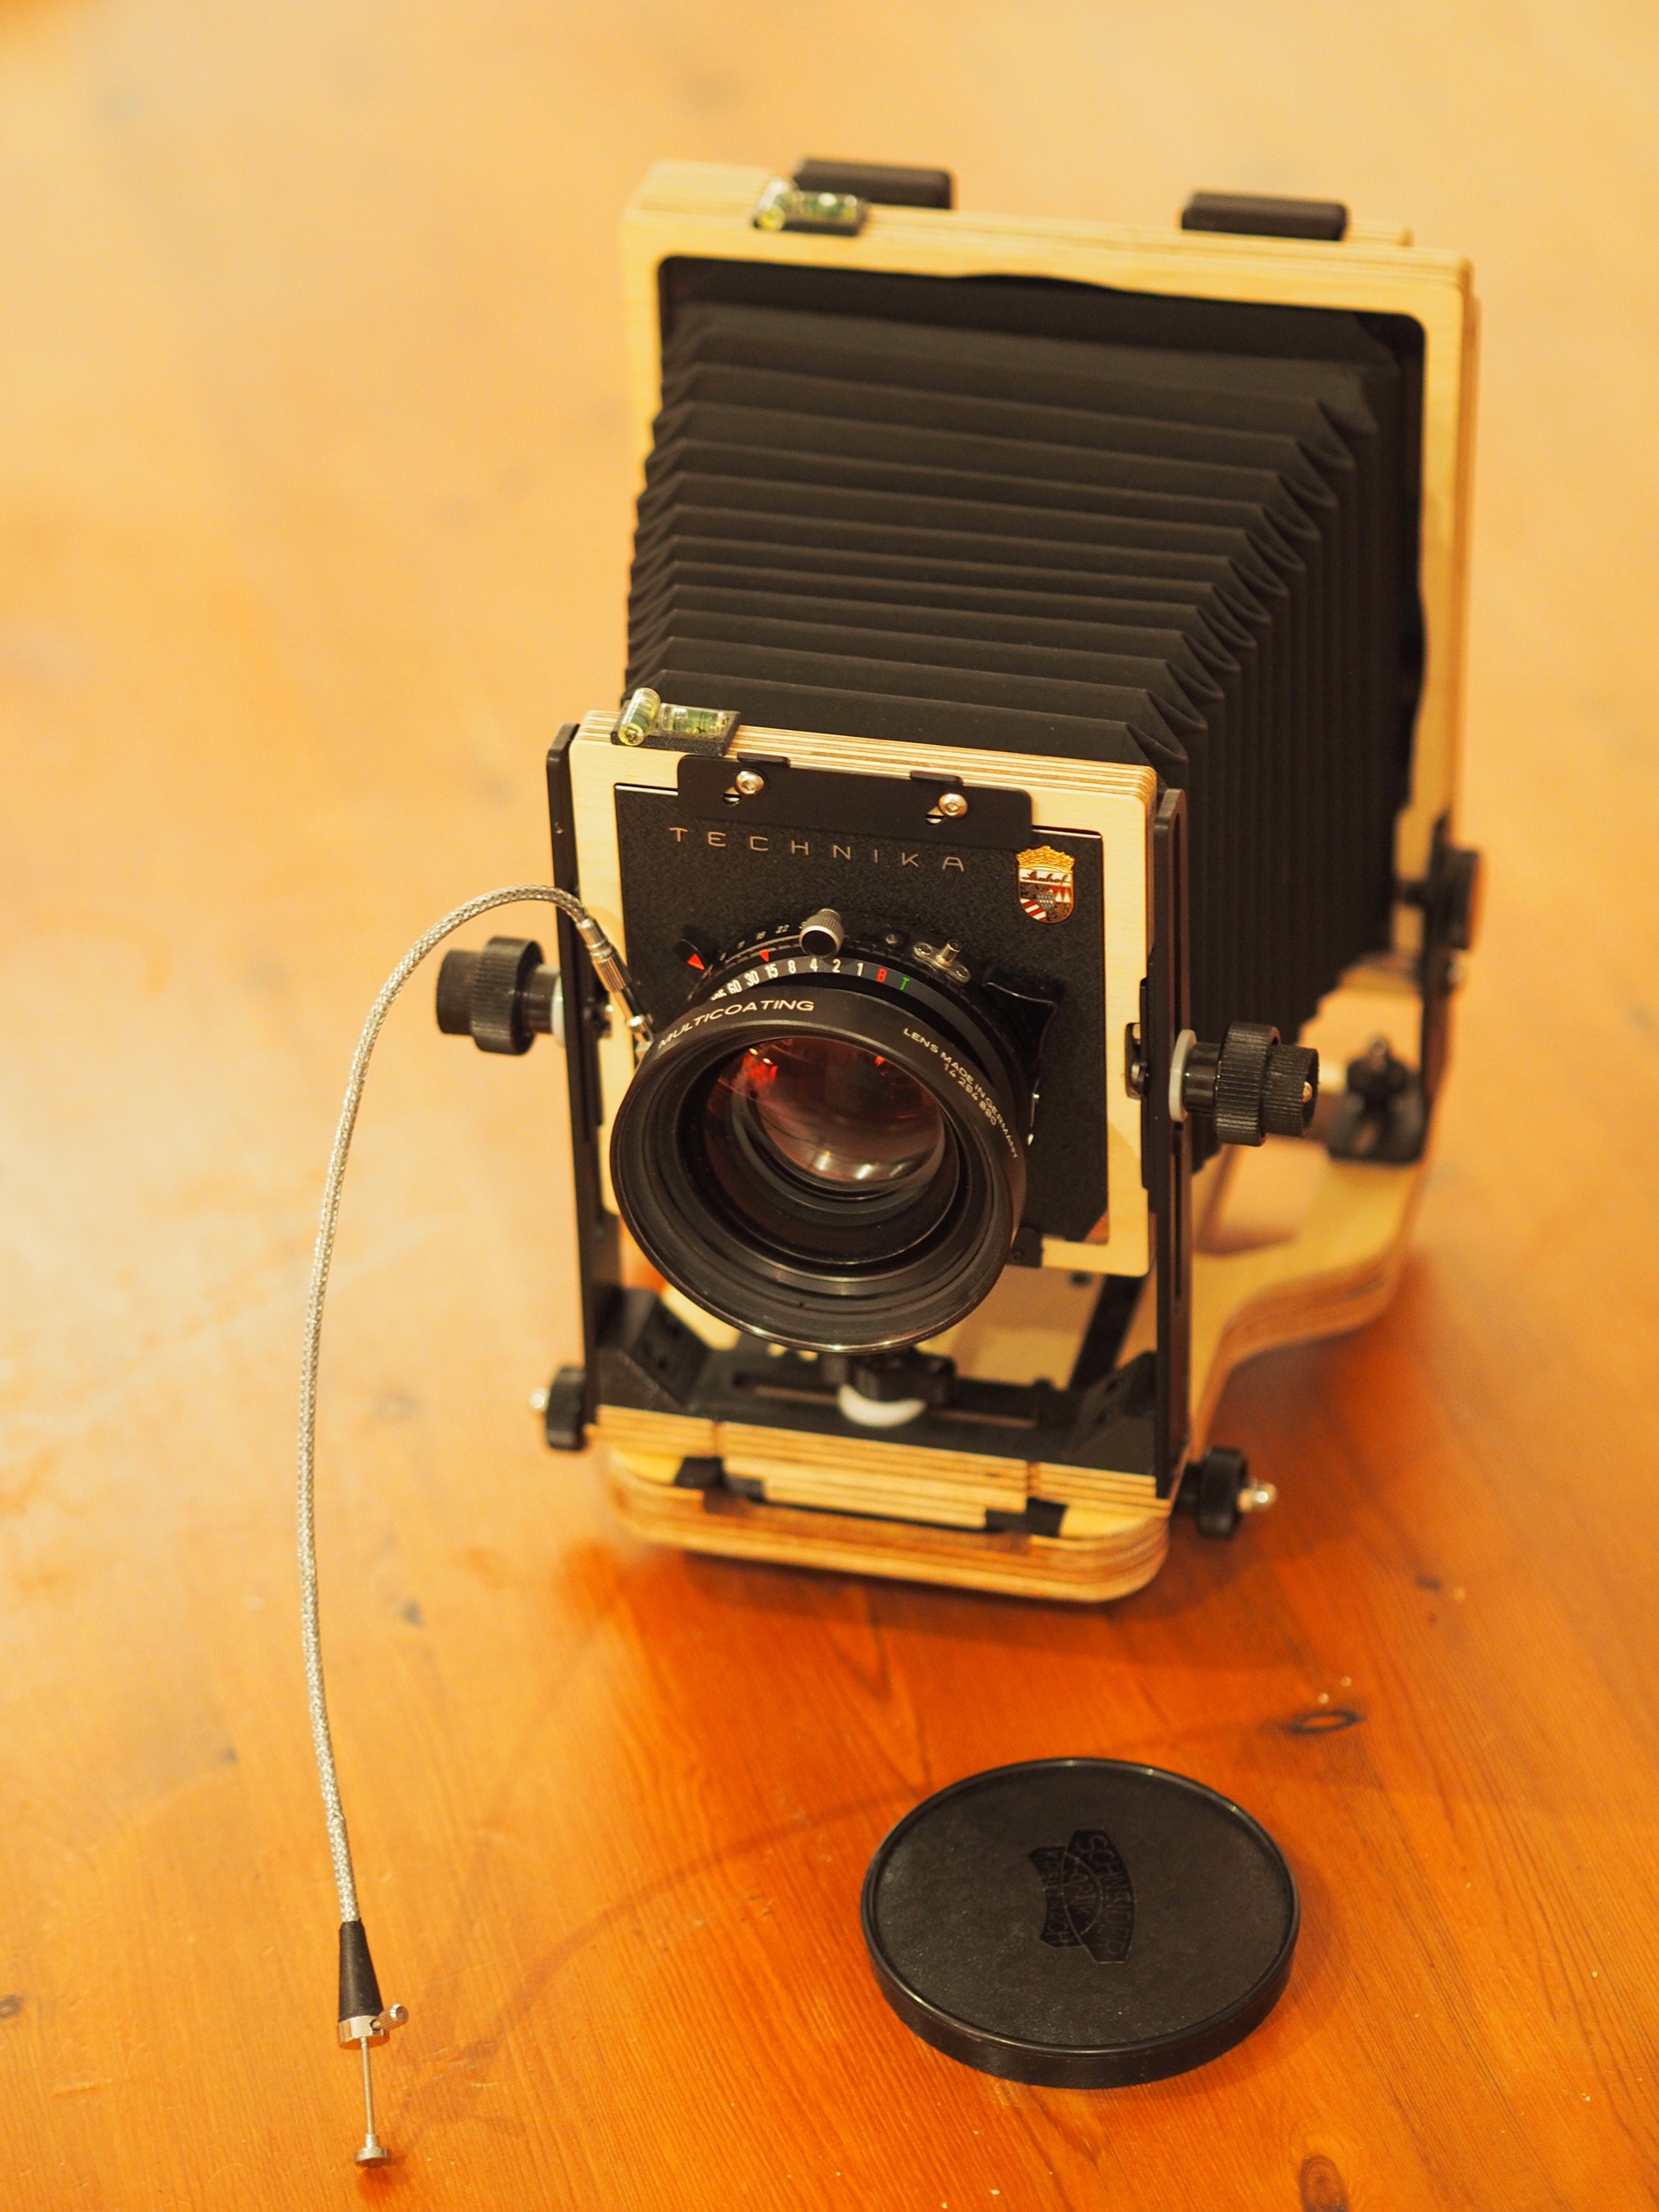
The Intrepid Camera
As we mentioned in the first post, we have purchased an Intrepid Camera and lens. Typically, mere days after we had taken delivery, Intrepid announced an updated version of the camera! Having had a good look at the new model it doesn’t offer anything we desperately need so it’s not too distressing.
The camera
The camera itself is essentially a light-proof box with a hole at one end for the lens (which must be mounted on a lens board) and a hole at the other end for the ground glass screen and (once focussed) the film plate. The bellows allows you to move the two ends so that the lens is correctly focussed. And that’s really it!
Here’s the view from the back.

When you see pictures of people using these cameras in the field, they have a black cloth over their head - the cloth isn’t actually attached to the camera (which is what I thought) but just draped over themselves to block the light from outside as the image you see above on the screen is actually very pale and hard to see in daylight. Once the picture’s focussed, you pull the glass plate out and replace it with a film plate…more on that in another post!.
a new venture
This year we have embarked on a new adventure in photography - we’re learning large format analogue!
We’ve purchased an Intrepid camera ( https://intrepidcamera.co.uk/ ) and found a lens that fits it, bought all the chemicals and tanks and built a dark room.
It’s early days and it’s going to be a steep learning curve, but we’re determined to learn this process.
